What is DFP?
Below is a quote from CSP Portal Help:
Infoblox ActiveTrust Cloud is a SaaS offering designed to provide protection to devices on and off-premises, including roaming, remote, and branch offices. It provides visibility into infected and compromised devices, prevents DNS-based data exfiltration, and automatically stops device communications with command-and-control servers (C&Cs) and botnets, in addition to providing recursive DNS services in the cloud. You can access the services by deploying the ActiveTrust Endpoint agent or the DNS forwarding proxy.
Brief Overview on DFP:
DFP behind the scenes is a DNS server which depending on the type of the query will forward DNS queries to a local DNS server or forwards it to AT Cloud (ATC). Our ATC DNS server has IP addresses 52.119.40.100.
In the CSP Portal, we can review information such as number of DNS queries that was forwarded from the DFP to the ATC (AT Cloud). We can also provide attach policies such as block/allow certain domains etc that reached ATC.
Requirements for deploying DFP:
- API key from CSP portal.
- A Docker host with internet connectivity. [Fresh install of Ubuntu 16.0.4.x used in this demo.]
- Infoblox DFP Docker Image.
Step 1: Add your DFP in CSP portal and obtain the API Key.
-Login to
https://csp.infoblox.com
.
-Click on Manage>DNS Forwarding Proxy.

-Click on the + symbol to add a DFP in the CSP portal.

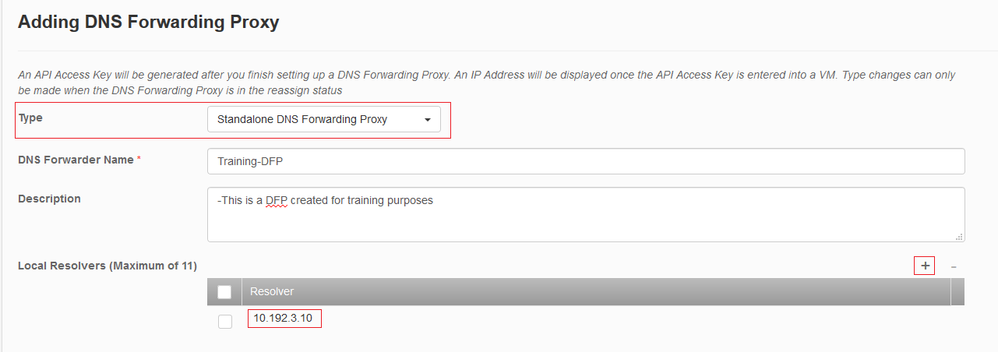
-Select the type as “Standalone DNS Forwarding Proxy”.
-Provide any name for “DNS Forwarder Name” and optionally add a description.
-Under Local Resolvers, add your Local office DNS Resolver.
-Here, I have added our internal DNS server 10.192.3.10 in my environment.
- Once done, click on “Save”.
-You will now be provided with an API key. Click on “Copy” and save it as we will require this key while we deploy DFP.

-If you view the status of DFP, it would show as “Inactive” as we have not yet downloaded and activated our DFP yet with the API key.
-Below is a screenshot for reference for the newly added DFP.

Step 2: How can I download DFP image for Docker?
-Login to
https://csp.infoblox.com
.
-Navigate to Administration> DNS Forwarding Proxy Download.

-Click on “Download Package for Docker Containers”. Please find screenshot below:

-Download the tar.gz file and save it to your PC.
-So, we have successfully downloaded the docker image to our PC.
Now, we need to transfer this file our docker host so that we can run this as a container.
Step 3: Deploy Infoblox DFP on Docker
Transfer the downloaded file via SCP:
We need to transfer the downloaded “.tar.gz” file to our docker host. You can scp the file from your local machine to your docker host.
-Login to your docker host(ubuntu VM) via SSH and verify that you are able to see the transferred file.

Step 3: Load the image and run the container:
In the earlier docker lessons, we downloaded/pulled images from the docker hub.
Currently, Infoblox do not offer a method to pull a DFP docker image from the docker hub. Instead, we need to manually download a tar.gz file and manually load this image to our docker host.
To load the load image, you can run the following command:
docker load -i ActiveTrust_DFP_Docker_1.2.18.tar.gz
[Note: The filename for the downloaded file may vary with time. For example: if a newer version of DFP is released, then the filename will reflect the new version]
Here is a screenshot:

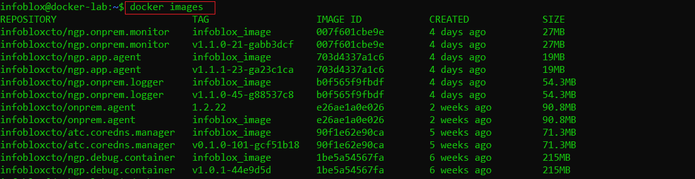
Run the following to check the loaded docker images and check the version.
docker images

-Here, the version is “1.2.18”.
To run a docker container out of this docker image, you can run the following command (Replace the text highlighted with the version of your API key):
docker run -d --name blox.noa --restart=always --net host --pid=host --privileged --log-opt max-file=2 --log-opt max-size=4m -v /var/run/docker.sock:/var/run/docker.sock infobloxcto/onprem.agent:<VERSION> -access-key=<DFP_ACCESS_KEY>
Note: Do not change the container name. The container name must be “blox.noa”.
In this lab setup, I have run the following:
docker run -d --name blox.noa --restart=always --net host --pid=host --privileged --log-opt max-file=2 --log-opt max-size=4m -v /var/run/docker.sock:/var/run/docker.sock infobloxcto/onprem.agent:1.2.18 -access-key=12345
-This will run the “blox.noa” container. This container would then download few other images and run the containers. Now, you can review the running containers
docker ps
-Below is a screenshot:

If you would like to view the logs of this container in Realtime, you can run the following command:
docker logs -f blox.noa

You can press CTRL+C to exit out of docker logs command:
-Wait for a few minutes, and check the output of “docker images” and you would be able to find few other images were downloaded.
-Run “docker ps” to view the running containers.

-Once all these containers are up, you can check the status and verify if it is “Active”.
-You can check the detailed status in “side” side toolbar by clicking on the small arrows.
Below is a screenshot for reference:

The “IP address” displayed is the local IP address of the docker host.

You can run “ifconfig” on your docker host to check your IP address.

-Here, 10.192.17.218 is the IP address of my docker host (ubuntu VM).
So, if you were able to reach this far, then you have successfully deployed Infoblox DFP on Docker.
To test DFP, you can perform the following:
From any laptop/PC in the same network, perform a DNS query pointing to the IP address of your DFP.
For example: (replace IP address with IP address of your DFP)
dig @10.192.17.218 google.com

-You can further test this by creating custom lists/security policies for blocking/allowing certain domains and attach them to your DFP.