Article Options
- Subscribe to RSS Feed
- Mark as New
- Mark as Read
- Bookmark
- Subscribe
- Printer Friendly Page
- Report Inappropriate Content
NetMRI - Customized Configuration Collection
Customized Configuration Collection
- This is an API enhancement that enables the customer to script their own configuration collection. This means that unsupported devices can have change management and configuration policy audits supported. This went in specifically for a customer that wanted policy checks done on SD-WAN Viptela routers.
The Script:
# BEGIN-SCRIPT-BLOCK
#
# Script-Filter:
#     true
#
# END-SCRIPT-BLOCK

import requests
#
# Stops us from erroring out when making a request call to a Self Signed Cert
#
requests.packages.urllib3.disable_warnings()
#
# "netmri_ipaddress" is a well known variable of your NetMRI
# I broke up the API version and the API call
#
api_v = "/api/3.3"
api_command = "/config_revisions/import_custom_config"
url = "https://"+ netmri_ipaddress + api_v + api_command
#
# Below I statically define the "DeviceID" which is "2" in this example this is my "Home Router" :)
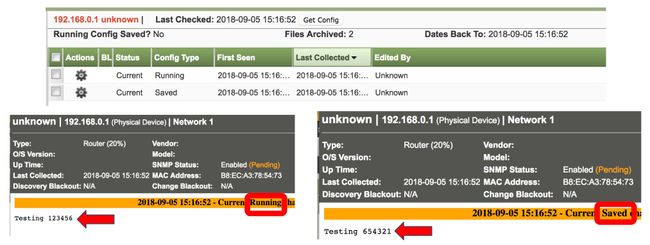
# We are going to add the following to 'RunningConfig': 'Testing 123456','SavedConfig': 'Testing 654321'
#
payload = {'DeviceID': '2', 'RunningConfig': 'Testing 123456','SavedConfig': 'Testing 654321'}

#
# We are going to use the "Username" and "Password" you logged in with for the API call
# http_username and http_password
#
r = requests.get(url, auth=(http_username, http_password), data=payload, verify=False)
Now for the fun stuff, we run the script
Now to back up a device that we do not support
Install Process
- SSH into the NetMRI and run “sandbox login”
- Login with sbuser/sbuser (you might have to change the password)
- Installing PIP(PIP is not installed by default)
- python3 get-pip.py
- This will run and download the binary of PIP and install it
- pip install paramiko
- Note - Paramiko
- The high-level client API starts with the creation of an SSHClient object. For more direct control, pass a socket (or socket-like object) to a Transport, and use start_server or start_client to negotiate with the remote host as either a server or client.
This following slide is one script that will “SSH” to a device you have selected and login via the “username” and “password” you supplied.
For this example, I’m just using a basic show command “show ip int brief”.
You can find on our Infoblox-Open GitHub - https://github.com/infobloxopen/netmri-toolkit/tree/master/NetMRI_GUI_Python
# BEGIN-SCRIPT-BLOCK
#
# Script-Filter:
#     true
#
# Script-Variables:
#     $cliuser string
#     $clipwd password
#
# END-SCRIPT-BLOCK
from infoblox_netmri.easy import NetMRIEasy
import paramiko
import time
import requests
#
# This will not error when you are not verifing Certs for https
#
requests.packages.urllib3.disable_warnings()
#
# "netmri_ipaddress" is a wellknown variable of your NetMRI
# I broke up the API version and the API call
#
api_v = "/api/3.3"
api_command = "/config_revisions/import_custom_config"
url = "https://"+ netmri_ipaddress + api_v + api_command

def disable_paging(remote_conn):
    '''Disable paging on a Cisco router'''
    remote_conn.send("terminal length 0\n")
    time.sleep(1)
    # Clear the buffer on the screen
    output = remote_conn.recv(1000)
    return output
if __name__ == '__main__':
    # We will prompt you for the username and password
    # "ip" will equal the well known variable "ipaddress"
    ip = ipaddress
    username = cliuser
    password = clipwd
    # Create instance of SSHClient object
    remote_conn_pre = paramiko.SSHClient()
    # Automatically add untrusted hosts (make sure okay for security policy in your environment)
    remote_conn_pre.set_missing_host_key_policy(
         paramiko.AutoAddPolicy())
 # initiate SSH connection
    remote_conn_pre.connect(ip, username=username, password=password, look_for_keys=False, allow_agent=False)
    print ("SSH connection established to %s" % ip)
    # Use invoke_shell to establish an 'interactive session'
    remote_conn = remote_conn_pre.invoke_shell()
    print ("Interactive SSH session established")
    # Strip the initial router prompt
    output = remote_conn.recv(1000)
    # See what we have
    print (output)
    # Turn off paging
    disable_paging(remote_conn)
 # Now let's try to send the router a command
    remote_conn.send("\n")
    remote_conn.send("show ip int brief\n")
    # Wait for the command to complete
    time.sleep(2)

 output = remote_conn.recv(5000)
    print (output)
    #
    # Below I statically define the "DeviceID" which is "2" in this example this is my "Home Router" :)
    # We are going to add the following to 'RunningConfig': 'Testing 123456','SavedConfig': 'Testing 654321'
    #
    payload = {'DeviceID': device_id, 'RunningConfig': output,'SavedConfig': 'Testing 654321'}
    #
    # We are going to use the "Username" and "Password" you logined it with for the API call
    # http_username and http_password
    #
    r = requests.get(url, auth=(http_username, http_password), data=payload, verify=False)
This is what the running Config Saved looks like
Comments


